Azeria Labs Azeria Labs
  • ARM Assembly
    • Part 1: Introduction to ARM Assembly
    • Part 2: ARM Data Types and Registers
    • Part 3: ARM Instruction Set
    • Part 4: Memory Instructions: LDR/STR
    • Part 5: Load and Store Multiple
    • Part 6: Conditional Execution and Branching
    • Part 7: Stack and Functions
    • Assembly Basics Cheatsheet
  • Online Assembler
  • Exploitation
    • Writing ARM Shellcode
    • TCP Bind Shell in Assembly (ARM 32-bit)
    • TCP Reverse Shell in Assembly (ARM 32-bit)
    • Process Memory and Memory Corruption
    • Stack Overflows (Arm32)
    • Return Oriented Programming (Arm32)
    • Stack Overflow Challenges
    • Process Continuation Shellcode
    • Glibc Heap – malloc
    • Glibc Heap – free, bins, tcache
    • Part 1: Heap Exploit Development
    • Part 2: Heap Overflows and the iOS Kernel
    • Part 3: Grooming the iOS Kernel Heap
  • Lab Environment
    • ARM Lab VM 1.0
    • ARM Lab VM 2.0
    • Debugging with GDB and GEF
    • Emulate Raspberry Pi with QEMU
    • Running Arm Binaries on x86 with QEMU-User
    • Emulating Arm Firmware
  • TrustZone Research
    • TEEs and Arm TrustZone
    • Trustonic’s Kinibi TEE
  • Self-Improvement
    • Deep Work & The 30-Hour Method
    • Paradox of Choice
    • The Process of Mastering a Skill
  • About
Getting started with ARM exploitation

Since I published the tutorial series on ARM Assembly Basics, people keep asking me how to get started with exploitation on ARM. Since then, I added some tutorials on how to write ARM Shellcode, an introduction to Memory Corruptions, a detailed guide on how to set up your own ARM lab environment, and some small intro to debugging with GDB. Now it’s time we get to the meat of things and use all this knowledge to start exploiting some binaries.

This first part is aimed at those of you who have no experience with reverse engineering or exploiting ARM binaries. These challenges are relatively easy and are meant to introduce a few core concepts of binary exploitation.

Your Lab Setup

In order to do any of the current or upcoming ARM challenges, you’ll need an ARM lab environment. The first simple stack overflow challenges are compiled for the ARMv6. You can either emulate your own ARMv6 in QEMU by following the manual setup tutorial, or you can just download a ready-to-play Lab VM.

  • Learn how to emulate a Raspbian ARMv6.
  • Download a ready-made lab VM.
Your first ARM challenges

The source code for the following challenges was derived from Protostar and compiled for the ARMv6.If you choose to use a different ARM processor, you can simply use the source code of these challenges and compile it on your preferred processor.

In case you downloaded the Azeria-Lab-v1 VM, you can follow these instructions to get started.

First, boot up your Raspbian:

Once you are inside your raspberrypi terminal, download the ARM challenges from Github to your Raspbian:

pi@raspberrypi:~ $ git clone https://github.com/azeria-labs/ARM-challenges.git
Cloning into 'ARM-challenges'...
remote: Counting objects: 12, done.
remote: Compressing objects: 100% (11/11), done.
remote: Total 12 (delta 6), reused 0 (delta 0), pack-reused 0
Unpacking objects: 100% (12/12), done.
Checking connectivity... done.
pi@raspberrypi:~ $ cd ARM-challenges/
pi@raspberrypi:~/ARM-challenges $ ls
README.md stack0 stack1 stack2 stack3 stack4 stack5 stack6
pi@raspberrypi:~/ARM-challenges $ chmod +x stack*
pi@raspberrypi:~/ARM-challenges $ ls
README.md stack0 stack1 stack2 stack3 stack4 stack5 stack6
Instructions

The following challenges are made for beginners. If you’re unfamiliar with stack overflows on ARM, you can read about it in Part 2: Process Memory and Memory Corruptions on ARM. For the last two challenges you’ll need ARM shellcode.

Some knowledge about how to use GDB is inevitable for these challenges. If you have no experience with GDB, worry not, here you can find an introduction to debugging with GDB.

Stack0

What you will learn

  • How memory can be accessed outside of its allocated region
  • How the stack variables are laid out
  • How to modify program execution

Goal: Change the ‘modified’ variable. You solved the challenge once “You have changed the ‘modified’ variable” is printed out.

Stack1

What you will learn

  • How to modify variables to specific values in the program
  • How the variables are laid out in memory

Goal: Change the ‘modified’ variable. You solved the challenge once “You have changed the ‘modified’ variable” is printed out.

Stack2

What you will learn

  • How environment variables can be set

Goal: modify the GREENIE variable

Stack3

What you will learn

  • Environment variables and how they can be set
  • How to overwrite function pointers stored on the stack
  • How to overwrite the saved PC

Goal: change the code flow by accessing the win() function

Stack4

What you will learn

  • How to overwrite PC
  • Standard buffer overflows

Goal: change the code flow by making PC jump to the win() function.

Stack5

What you will learn

  • Standard buffer overlow
  • How to use shellcode to take advantage of a buffer overflow

Goal: overwrite PC and make it branch to your shellcode.

Wouldn’t it be cool if you could use your own shellcode for this challenge? Hell yeah, you can learn how to write your own shellcode by following my tutorial on Writing ARM Shellcode. Try it out, it’s not that hard and it’s fun! 🙂

Stack6

What you will learn

  • What happens when you have restrictions on the return address?
  • ret2libc, or ROP

Goal: Get control over PC and execute your shellcode using techniques like ret2libc or ROP

Let’s start…

Run your first challenge in GDB and set a breakpoint at the main function:

pi@raspberrypi:~/ARM-challenges $ gdb stack0
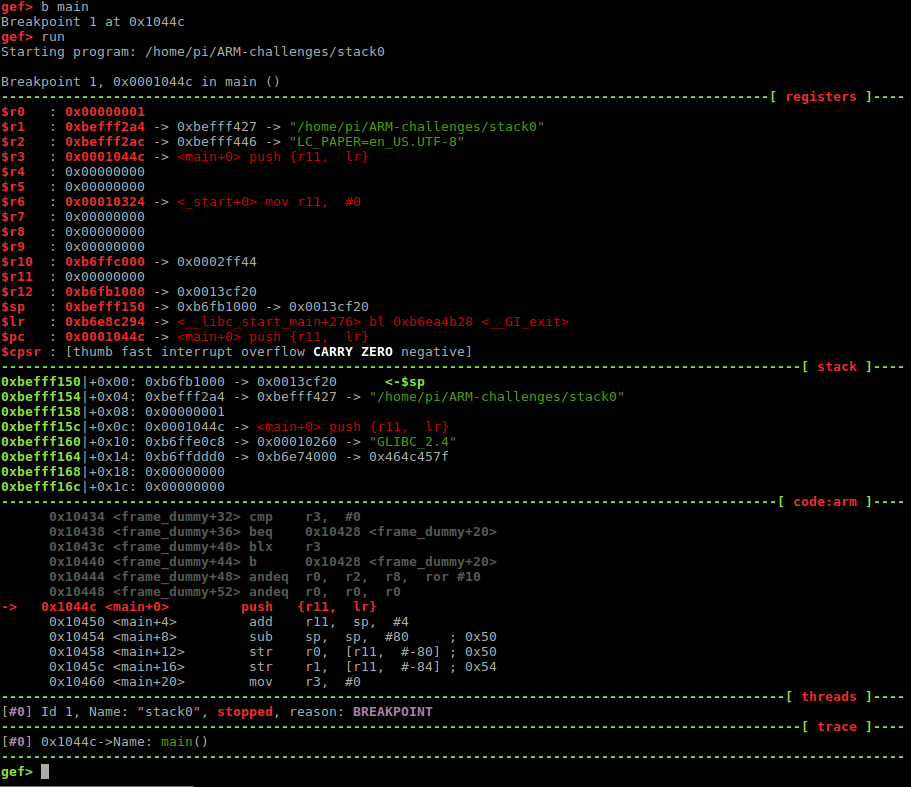
gef> b main
Breakpoint 1 at 0x1044c
gef> run

Your binary reached the first breakploit. This is what you should see:

Now, let’s look at the main function with “disassemble main”.

gef> disassemble main
Dump of assembler code for function main:
=> 0x0001044c <+0>: push {r11, lr}
 0x00010450 <+4>: add r11, sp, #4
 0x00010454 <+8>: sub sp, sp, #80 ; 0x50
 0x00010458 <+12>: str r0, [r11, #-80] ; 0x50
 0x0001045c <+16>: str r1, [r11, #-84] ; 0x54
 0x00010460 <+20>: mov r3, #0
 0x00010464 <+24>: str r3, [r11, #-8]
 0x00010468 <+28>: sub r3, r11, #72 ; 0x48
 0x0001046c <+32>: mov r0, r3
 0x00010470 <+36>: bl 0x102e8
 0x00010474 <+40>: ldr r3, [r11, #-8]
 0x00010478 <+44>: cmp r3, #0
 0x0001047c <+48>: beq 0x1048c <main+64>
 0x00010480 <+52>: ldr r0, [pc, #24] ; 0x104a0 <main+84>
 0x00010484 <+56>: bl 0x102f4
 0x00010488 <+60>: b 0x10494 <main+72>
 0x0001048c <+64>: ldr r0, [pc, #16] ; 0x104a4 <main+88>
 0x00010490 <+68>: bl 0x102f4
 0x00010494 <+72>: mov r0, r3
 0x00010498 <+76>: sub sp, r11, #4
 0x0001049c <+80>: pop {r11, pc}
 0x000104a0 <+84>: andeq r0, r1, r12, lsl r5
 0x000104a4 <+88>: andeq r0, r1, r8, asr #10
End of assembler dump.
gef>

Step through the instructions and watch how the registers and the stack values change. For that, you can use the commands “nexti” or “stepi”.

If you continue the program with “continue” or “c”, it will expect some input from you:

gef> c
Continuing.

Try screaming at it a little (with AAAAAAAAA’s) and see what happens:

gef> c
Continuing.
AAAAAAAAAAAAAAA
Try again?
[Inferior 1 (process 913) exited normally]
gef>

Oh, that was not enough screaming it seems. Try again and scream a little more. But first, run the binary again:

gef> run
Starting program: /home/pi/ARM-challenges/stack0

Breakpoint 1, 0x0001044c in main ()
[...]

gef> c
Continuing.
AAAAAAAAAAAAAAAAAAAAAAAAAAAAAAAAAAAAAAAAAAAAAAAAAAAAAAAAAAAAAAAAAAAAAAAAAAAAAAAAAAAAAAAAAAAAAAAAAAAAAAAAAAAAAAAAAAAAAAAAAAAAAAAAAAAAAAAAAAAAAAAAAAAAAAAAAAAAAAAAAAAAAAAAAAAAAAAAAAAAAAAAAAAAAAAAAAAAAAAAAAAAAAAAAAAAAAAAAA
you have changed the 'modified' variable

Program received signal SIGSEGV, Segmentation fault.
0x41414140 in ?? ()

Yaaay! You got it! You successfully changed the ‘modified’ variable and caused the program to crash.

ARM Exploit Development

  • Writing ARM Shellcode
  • TCP Bind Shell (ARM 32-bit)
  • TCP Reverse Shell (ARM 32-bit)
  • Process Memory and Memory Corruption
  • Stack Overflows (Arm32)
  • Return Oriented Programming (Arm32)
  • Stack Overflow Challenges
  • Process Continuation Shellcode
  • Introduction to Glibc Heap (malloc)
  • Introduction to Glibc Heap (free, bins)
  • Heap Exploit Development (Part 1)
  • Heap Overflows and iOS Kernel (Part 2)
  • Grooming the iOS Kernel Heap (Part 3)

Twitter: @Fox0x01 and @azeria_labs

New ARM Assembly Cheat Sheet

Poster Digital

Cheat Sheet
© 2017-2022 Azeria Labs™ | All Rights Reserved.